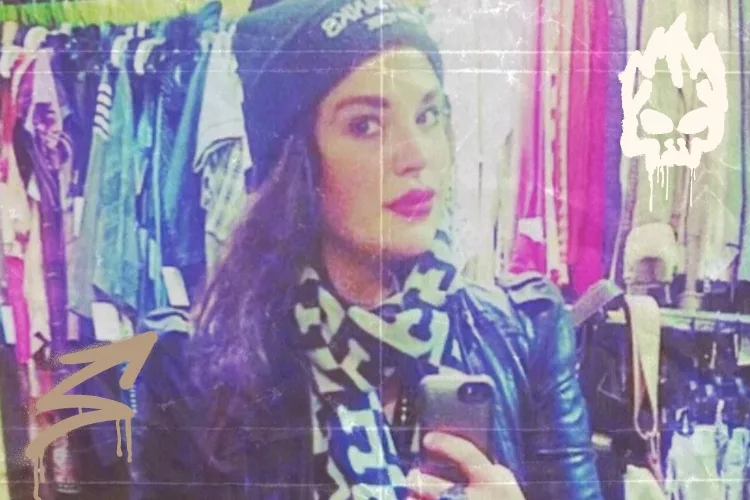
We have all been there. We buy a pair of jeans we love; we wear them for a while and suddenly… we just don’t feel it anymore.
They don’t fit like they used to, or aren’t comfortable or our taste changed, it is normal. Here, at No Kill we do not believe in throwing away old clothes. We believe in creating the old into something new and as luck would have it, we have explored 4 ways you can upcycle your own jeans into something new and exciting you will love.
Scrunchies
We all love a good scrunchie. While it is also practical, a scrunchie can really add an extra touch to an outfit. There is no doubt that they can be quite costly, so why pay for it if we can make it ourselves with little things we have around the house, while also being sustainable!
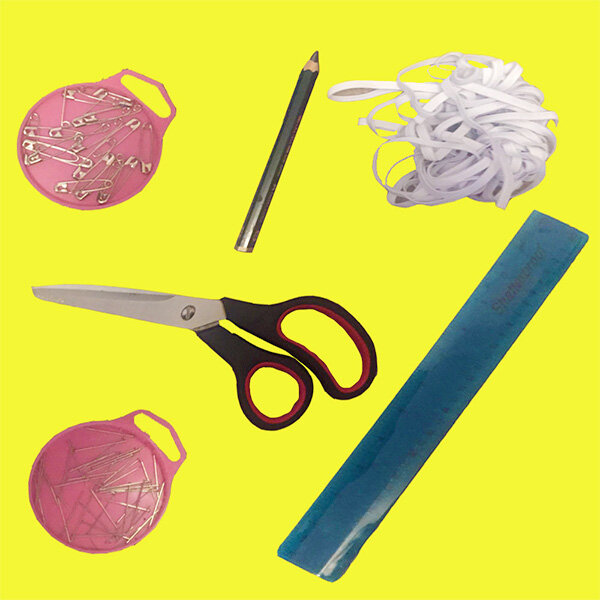
What you will need:
-
A pair of strong scissors
-
A Pencil
-
Thin Elastic band (could also be recycled from an old hair band or scrunchie)
-
A safety Needle
-
Pins
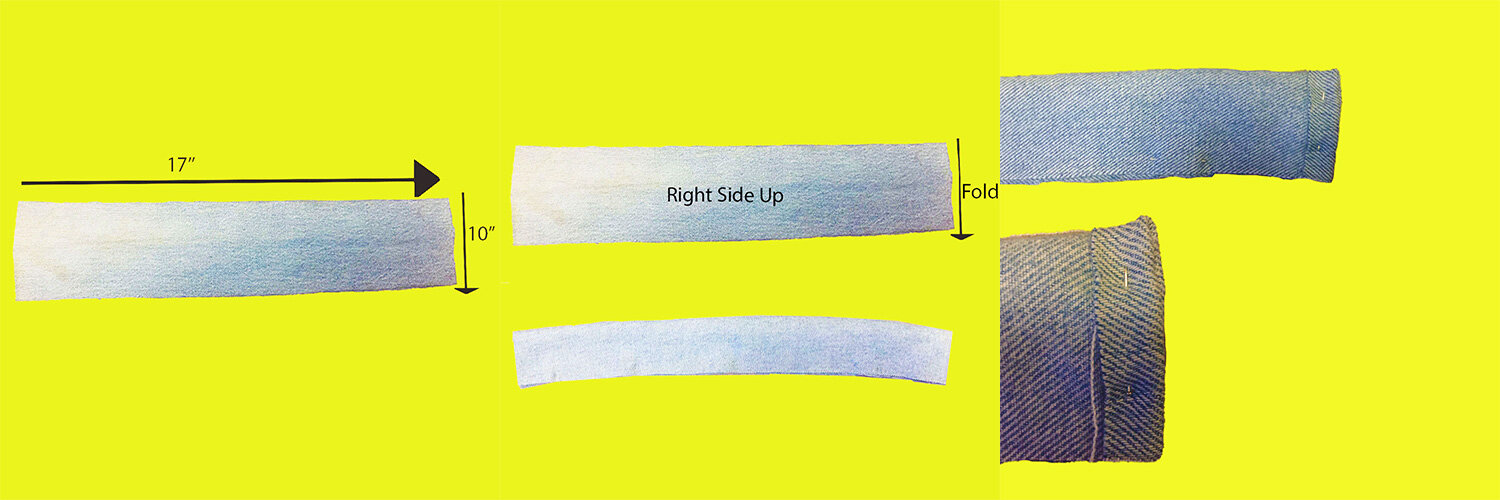
Step 1: Draw a 17×4 inch rectangle onto a good place on your jeans. A little sidenote: choose the dimensions that fit your hair the best. For instance, if your hair is quite thick, you might benefit from a longer and wider rectangle. Cut out your rectangle.
Step 2: Fold the rectangle with the wider edges facing each other and the right side of the denim upwards. Add pins along the open edges to secure the fold.
Step 3: Fold the edges of one side of the rectangle over and add a pin to secure it.
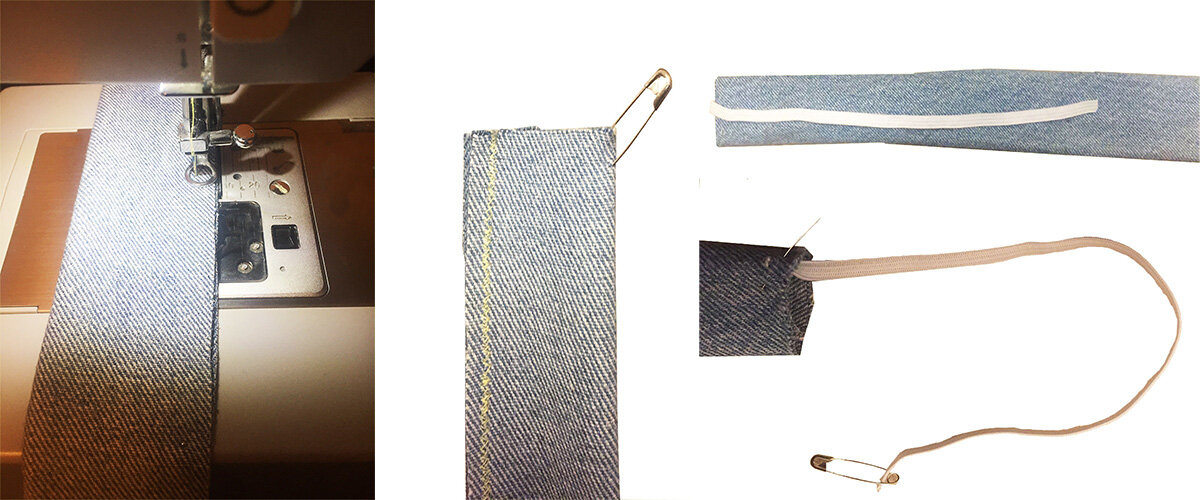
Step 4: Sew along the edges, this can be done with a sewing machine or per hand.
Step 5: Add a safety pin through a corner of the fabric, looping it through to turn the fabric the right side out.
Step 6: Now it is time to add the elastic. There is no right or wrong length for this, however, make sure the elastic is shorter than the length of your rectangle. The shorter, the elastic, the tighter your crunchy will be. In this image, we have chosen 8 inches.
Add a safety pin through the corner of the elastic and secure the other on the inside edge of your fabric. Now pull the elastic through leading it with the safety pin.
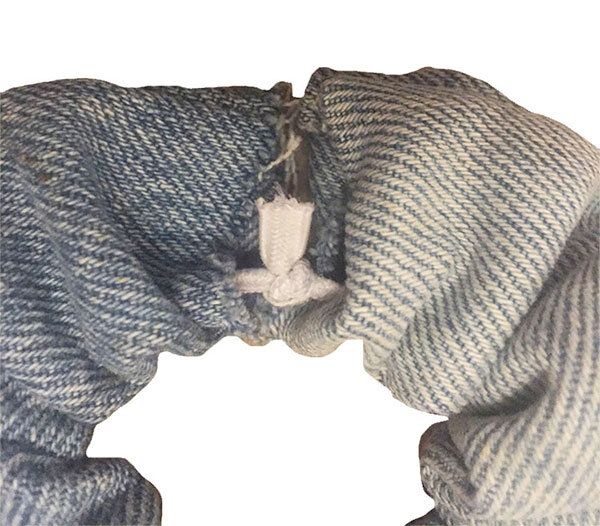
Step 7: After you feel comfortable with the size and gather of the scrunchie, make a double knot into the elastic and move the elastic so the knot is not under the opening of the scrunchie. Lastly, make sure the unfolded edge of the opening goes inside the edge we previously folded and sew it shut. This can be done per hand or machine.
Flower power Denim Earrings
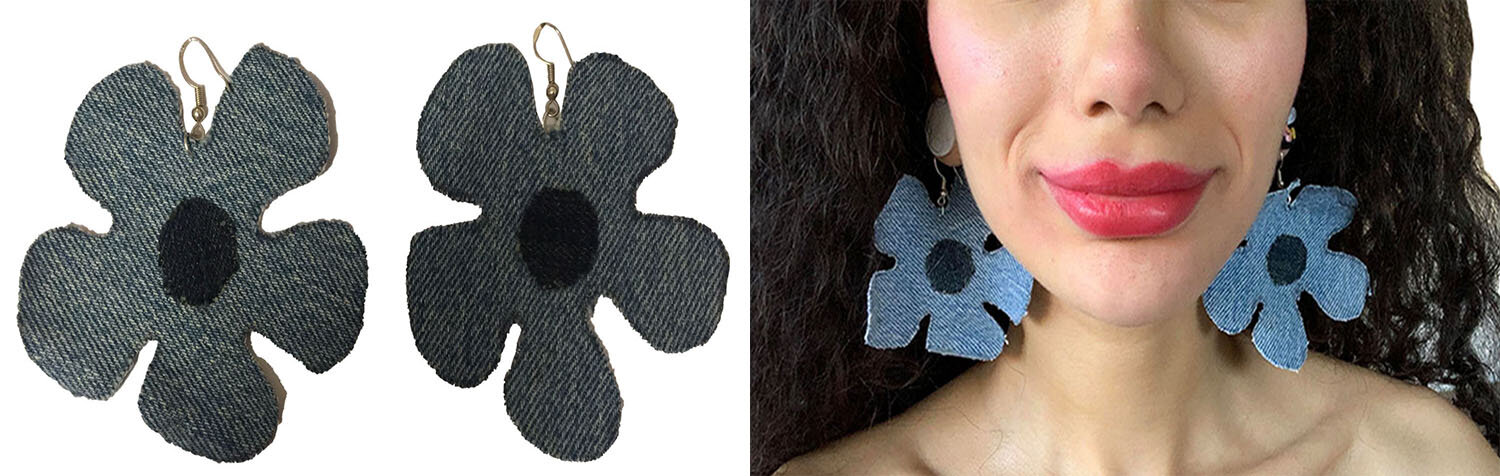
Your denim flower power earrings!
Denim fabric is great to make earrings from, and so easy as well! As spring is slowly approaching, we have chosen a flower theme, however you can choose any shape you want!
What you will need:
-
A pair of strong scissors
-
A pen
-
Paper that is big enough for your desired shape
-
Earring hooks (These can be recycled from a pair of old earrings you might not wear anymore)
-
A strong needle
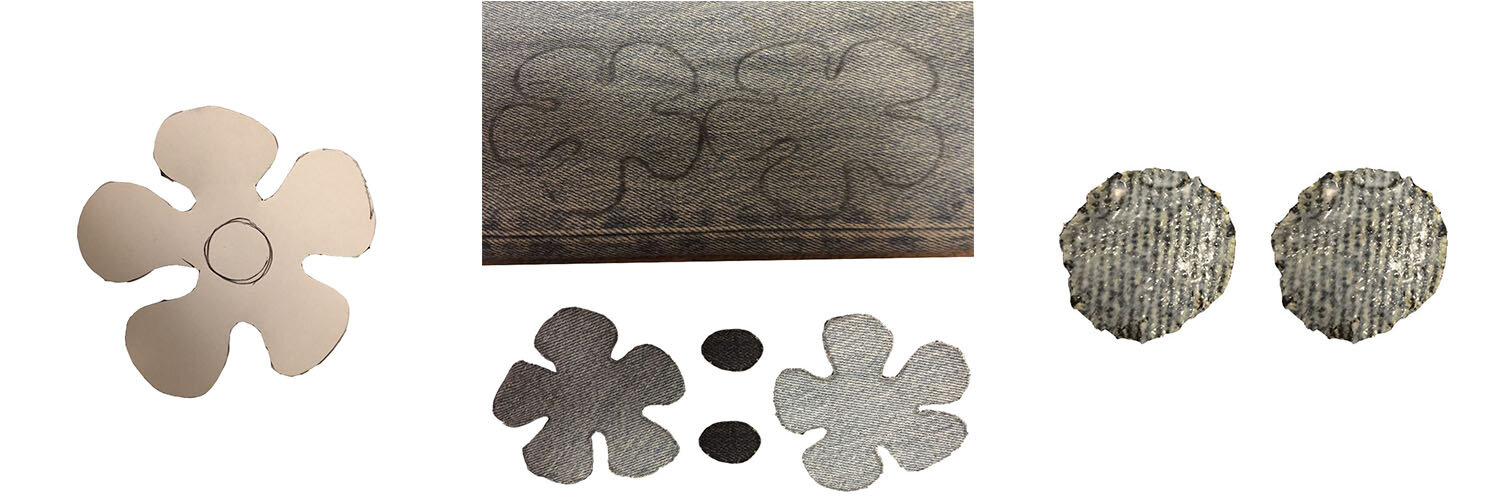
Step 1: Draw your design or shape onto a piece of paper and cut it out
Step 2: Trace your design onto the denim and cut it out.
Step 3: To complete the silhouette, glue the denim circle into the middle of the flower shape with fabric glue, however you can sew it as well if you have not got any fabric glue.
Step 4: Now take a strong needle and poke a hole through the edge of the denim flower, just big enough for your ear hooks to fit through. With a steady hand pull through your ear hooks and secure them.
Flower Power Handbag
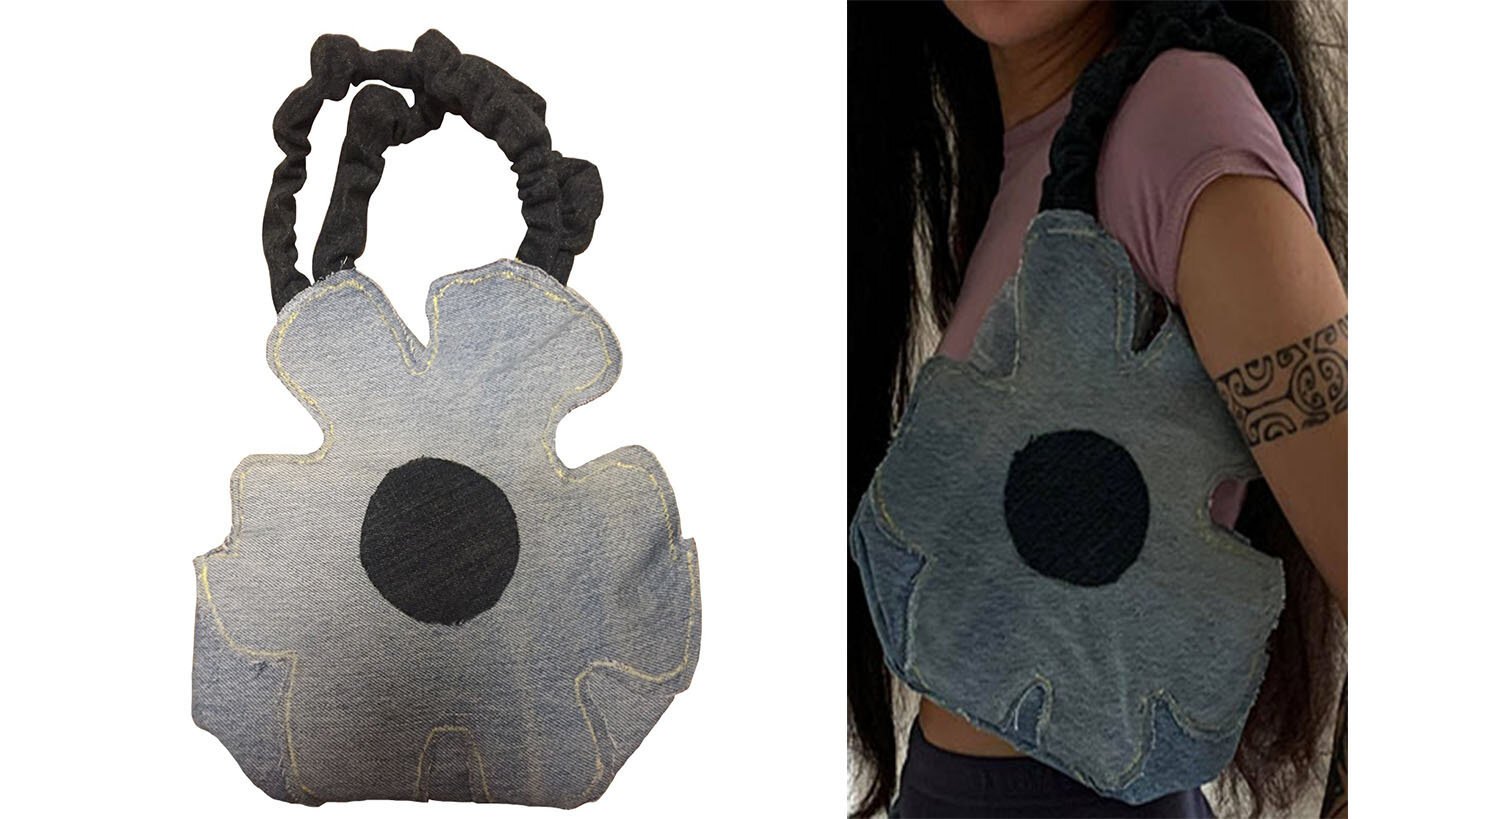
Love those cute y2k shoulder bags? The firm denim of our old jeans is the perfect material to make one ourselves!
What you will need:
-
2 A4 pieces of paper
-
A pair of strong scissors
-
Elastic
-
A safety-pin
-
Pins
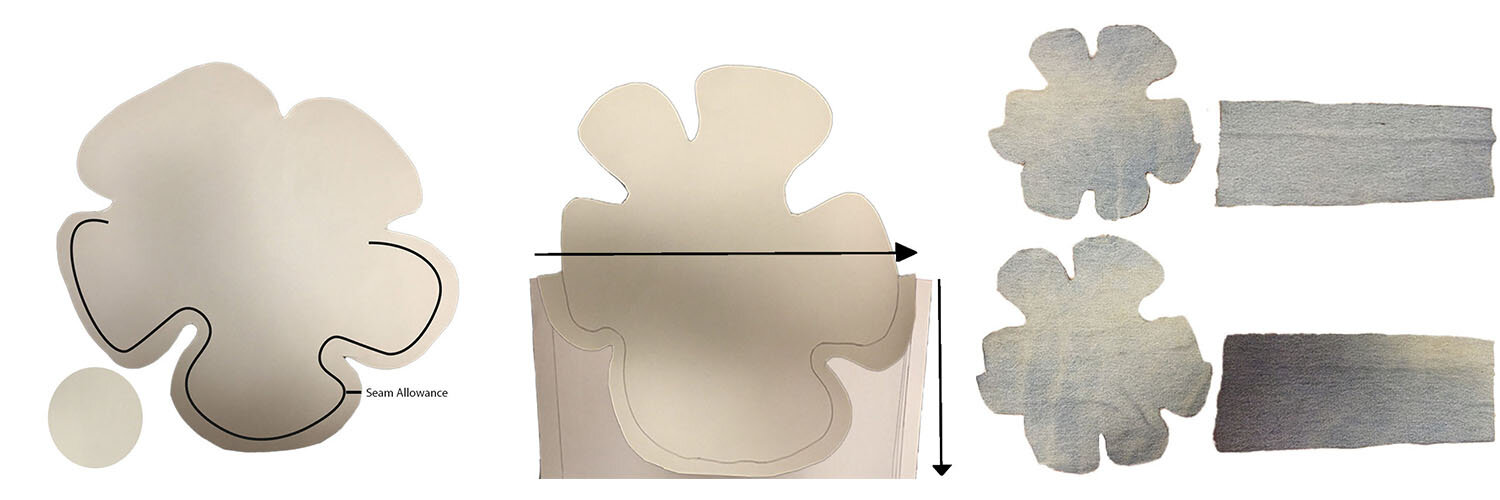
Step 1: Draw your flower shape onto a piece of a 4 paper, making sure you include a 1-inch seam allowance in the bottom half of the design.
Step 2: With your other piece of A4 paper cut out a rectangle with the dimension of the width and half of the length of your flower shape. Make sure you add a 1-inch seam allowance to each shorter sides of the rectangle.
Step 3: Trace your flower shape and rectangle onto your fabric and cut out two pieces for each shape, to have a front and back of the bag. Make sure to mark your seam allowance on the fabric as well!

Step 4: Take your 2 sets of rectangles and sew them to the bottom halves of each flower shape, ensuring you are following the shape of the flower. You can use bright thread, making the design more exciting.
Step 5: We now attach the denim circle into the middle of the flower shape to complete the silhouette. This can again, be either done with fabric glue or sewing.
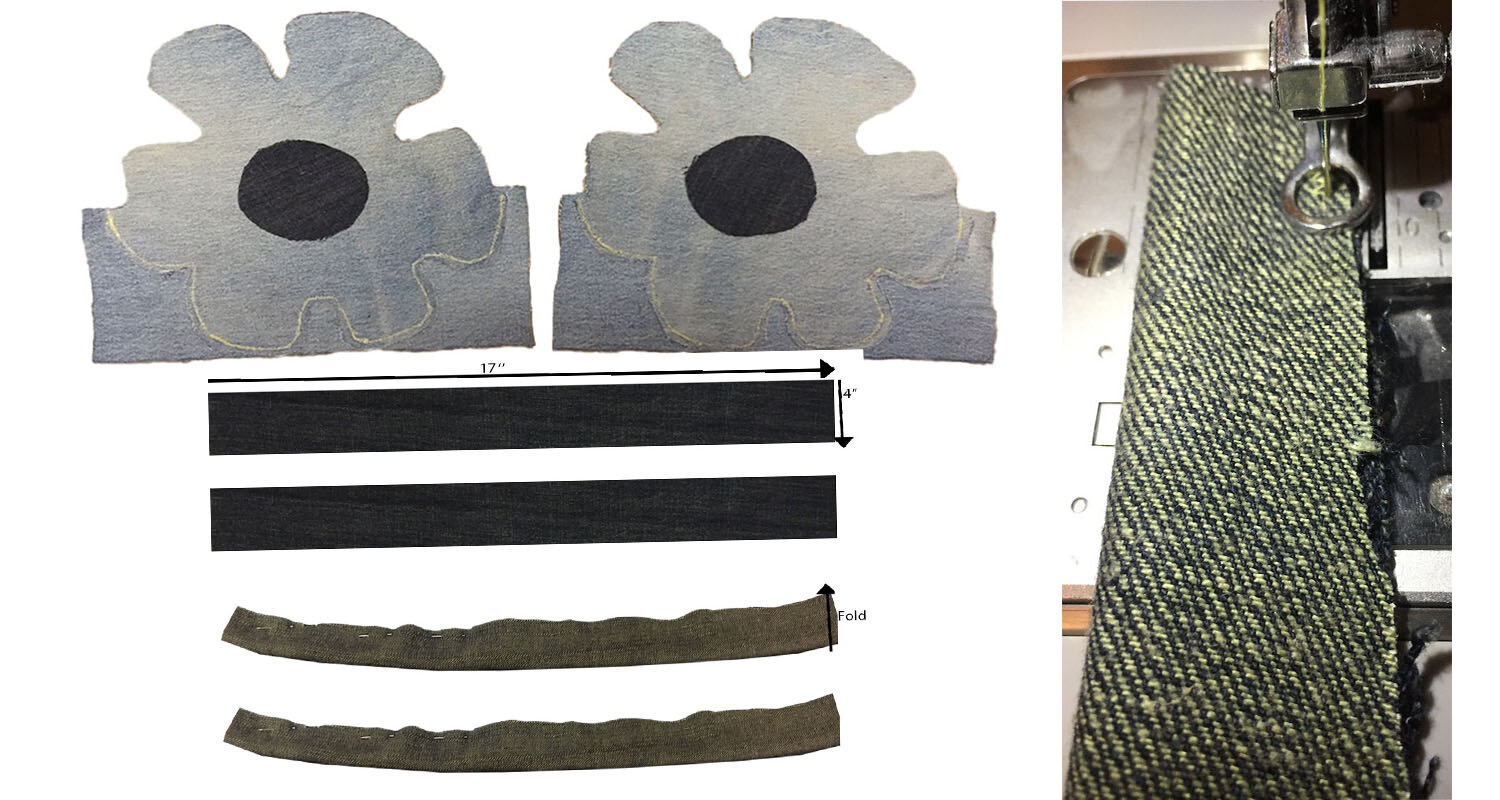
Step 6: Now it is time to create the handles of your shoulder bag. Determine the size of your handles, depending on your personal preference. Here we have cut 2 rectangles with the dimensions 17×4 inches. As we had previously done with the scrunchie, we now fold the rectangle with the wider edges facing each other and the right side of the denim upwards. Add pins along the open edges to secure the fold.
Step 7: Sew along the open fold of both rectangles.
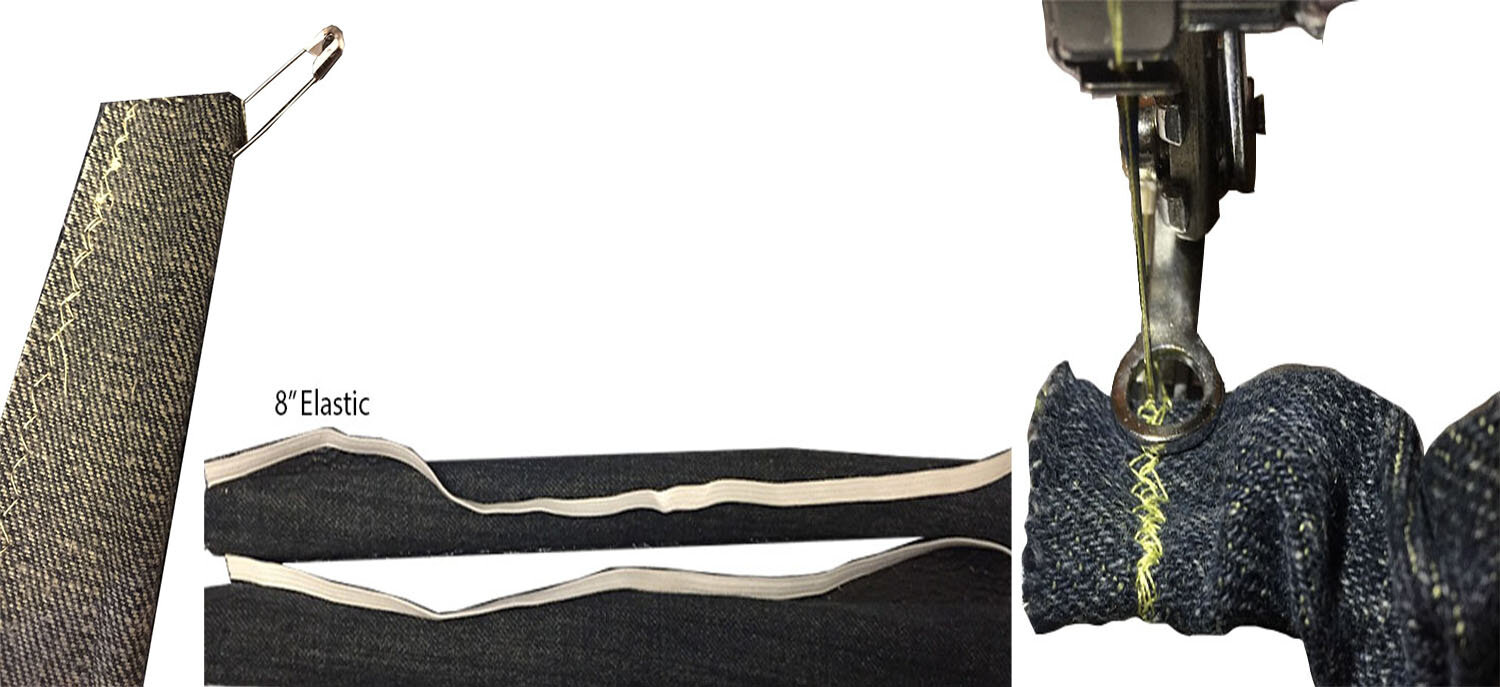
Step 8: Attach your safety pin to the corner of your handle, looping it through the opening to turn it the right side out for both pieces.
Step 9: Choose two pieces of elastic with the recommended length of 8 inches and loop it through each handle with your safety. Secure Your elastic inside your handles with pins.
Step 10: Sew each opening of both handles shut, making sure to also sew over each end of the elastic to secure the gather of the handles.
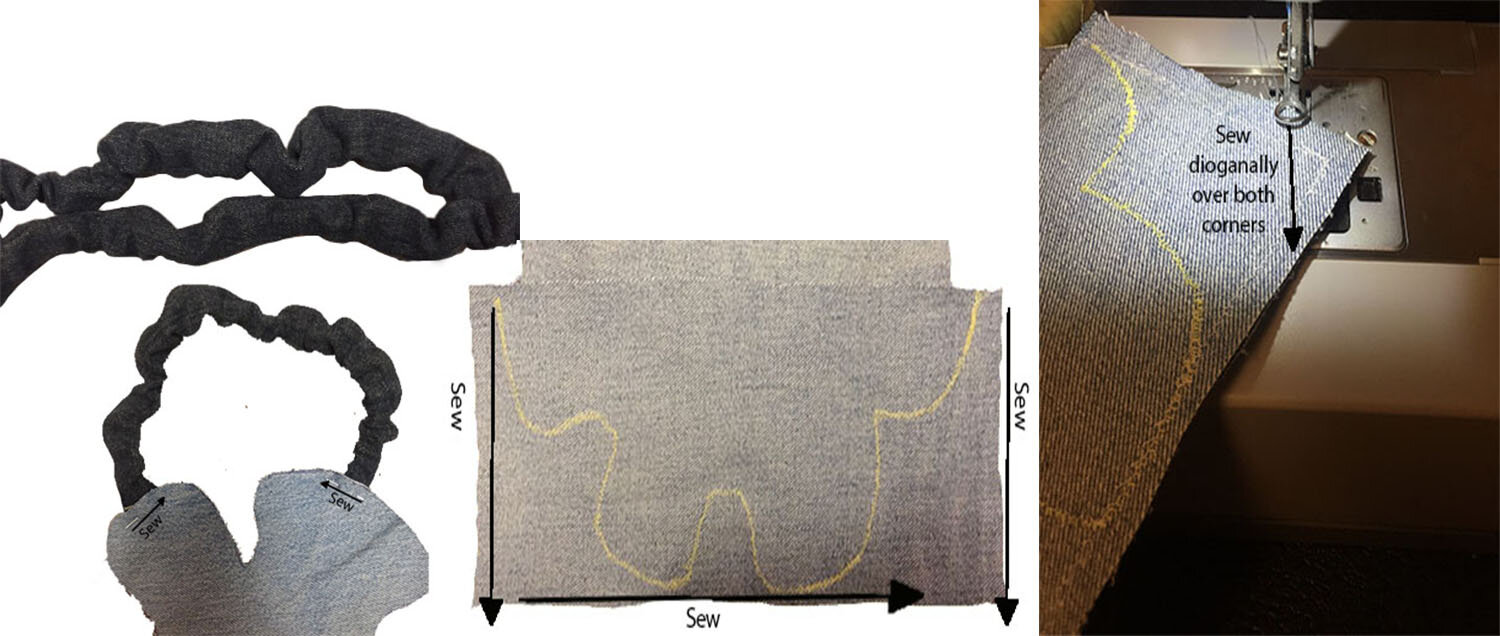
Step 11: Determine the placement of your bag handles and sew them on. Make sure, you use a thread colour that blends in with the colour of your denim.
Step 12: After attaching the handles on each side of the back, it is time to join them. For this lay both, front and back side of the bag, on top of each other with the right sides facing each other. Sew along the sides, and bottom, considering your previously set seam allowance.
Step 13: Lastly, sew diagonally over both bottom corners of the bag before turning your finished piece the right side out.
Flower power denim top/Skirt
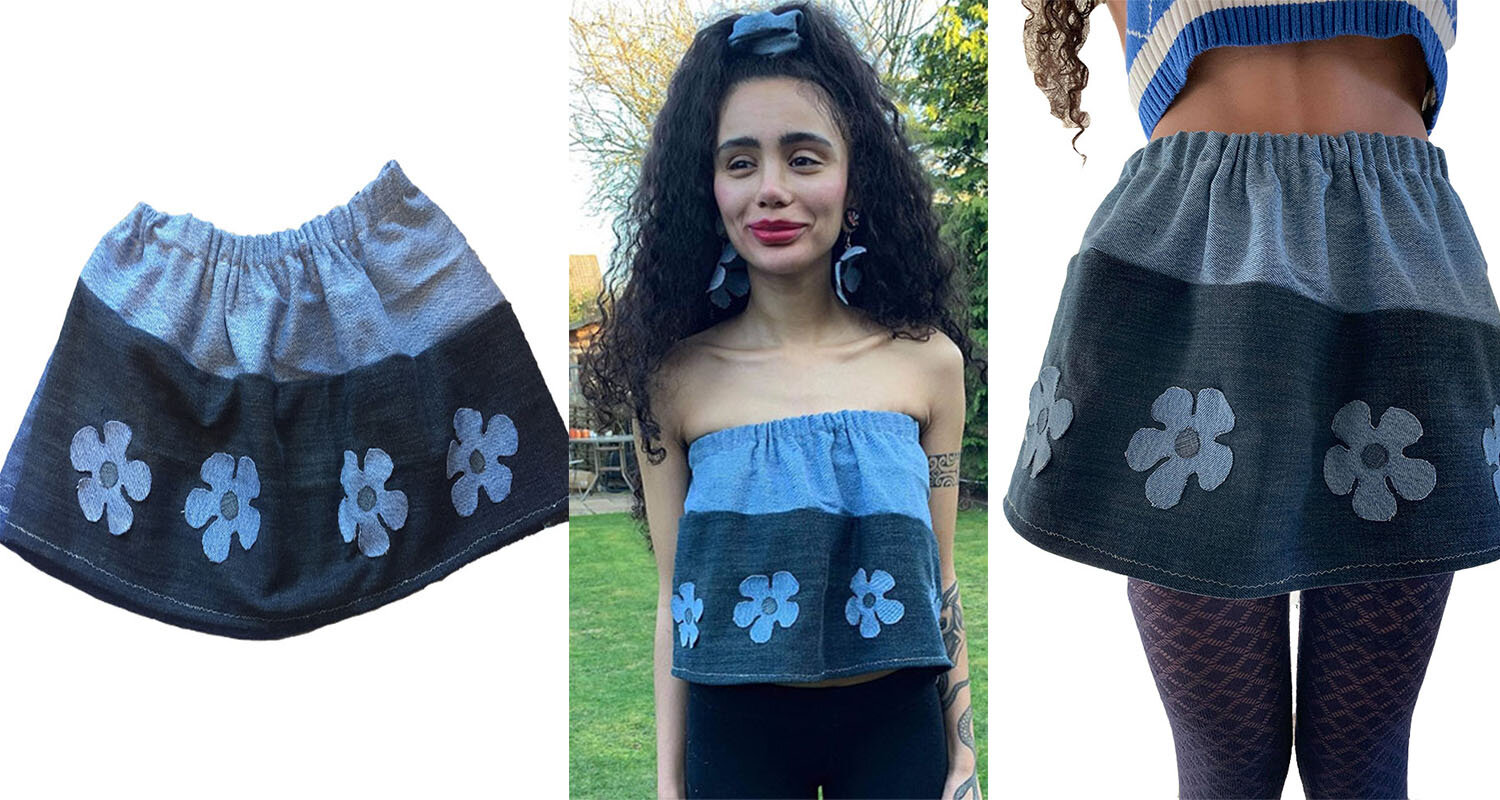
There is no better way to get mileage out of your old jeans than making a top that also works as a skirt!
What you will need:
-
A pair of strong scissors
-
Wide Elastic band (this can be recycled from old joggers or other elasticated garments)
-
Pins
-
A safety Pin
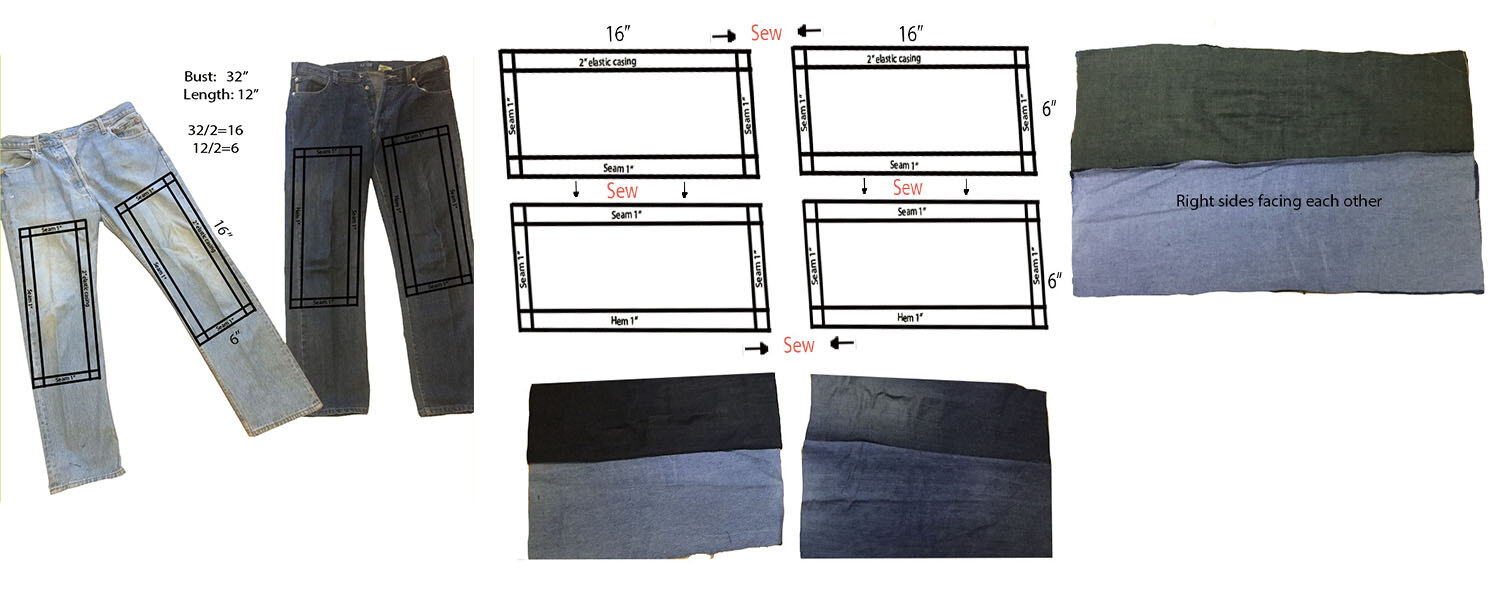
Step 1: Measure your bust size and determine the desired length of your top. Note down Your dimensions. Use your dimensions to draft 2 rectangles (front and back) onto your jeans. If your jeans are not big enough, to draw a rectangle with your full dimensions, you can half them, into two rectangles for each, front and back. Refer to the Image.
Step 2: Sew together your individual rectangles to complete your dimensions. You should end up with two rectangles that have your desired length and bust size.
Step 3: Place fabrics on top of each other with the right sides facing each other and sew together the shorter sides, leaving a hole in the middle.
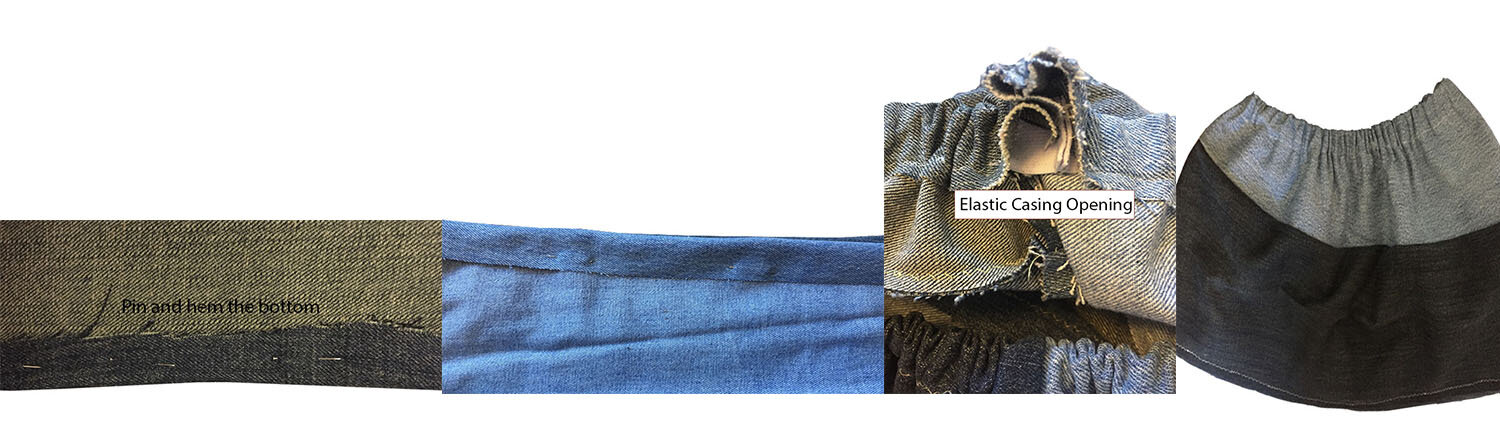
Step 4: Hem the bottom of your top. Here, we have used a hem allowance of 1 inch.
Step 5: Fold the upper edges of your top approximately 2 inches, to create a casing for your elastic and sew it, making sure you leave enough space for the elastic to be inserted.
Step 6: Cut your elastic to the same size as your bust circumference and attach a safety pin to its corner. Pull your elastic though the casing, leading it with the safety pin and sew the opening shut.
Now you can use your remaining caps to create cool shapes you can glue or sew onto your top!
If your top has a good length it can also be used as a skirt!
–Nadine El Garhy